5 Inexpensive Ways to Style Pumpkins All Fall

Do you have all the desire to decorate for the entire fall season, and little money to do so? Yeah, me too.

Every time Halloween ends, I toss out our rotted pumpkins and I feel like I toss out heaps of my money right along with them. Not only that, but I’m left with little to no decorations on my porch for Thanksgiving! Now, if you haven’t noticed the massive expense of fall decorating, take out cash the next time you go to purchase real pumpkins and everything that goes with them. Your pocket book will drain faster than you can say PSL!

I could buy fake pumpkins, but one of my favorite parts of fall is romping around the pumpkin patch in search of the perfect ones! In addition to that, I prefer the natural look of the real pumpkins, especially for the front porch.  This leaves quite the predicament. And I have the feeling I’m not alone in this. Do I prefer a barren and sad little porch, or wasted money?

Fortunately, there’s always a way to work with your budget. A little innovation and a pinch of creativity can provide you with all the fall fun no wasted money.

Here are some inexpensive ways to make your (real) pumpkin arrangements last from October through Thanksgiving!
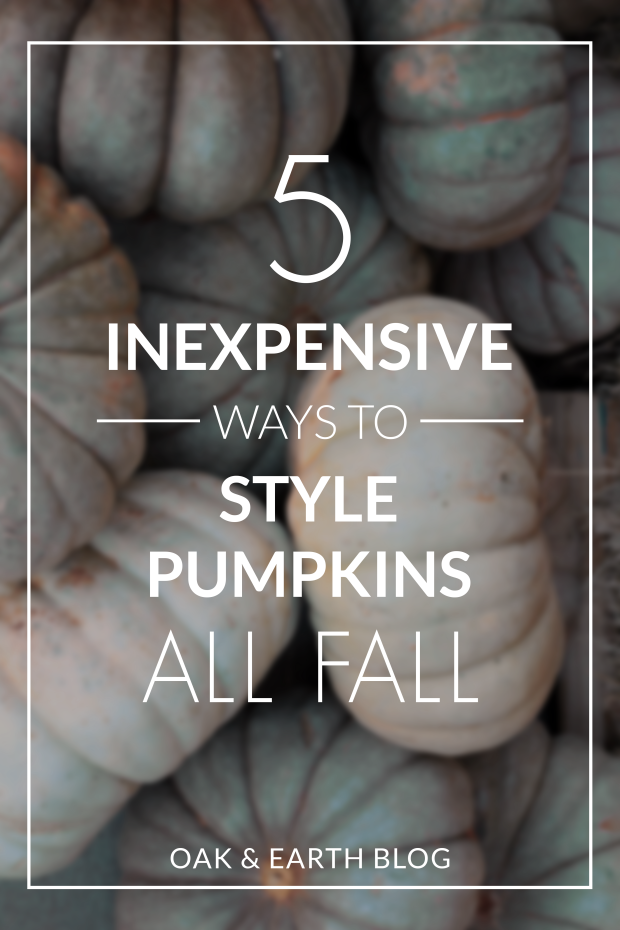
pinterest_img

Pin this image!


1.Preserve your pumpkins.

One of the best ways to have your natural arrangements last is to prep your pumpkins ahead of time. Once you preserve them, most can last at least a couple of months. With this technique, you can pick out the best pumpkins and keep them around through Thanksgiving! This alone will save you a lot of money. Here are few links I found that will help guide you in the preservation process. Try HERE or HERE.

blog024

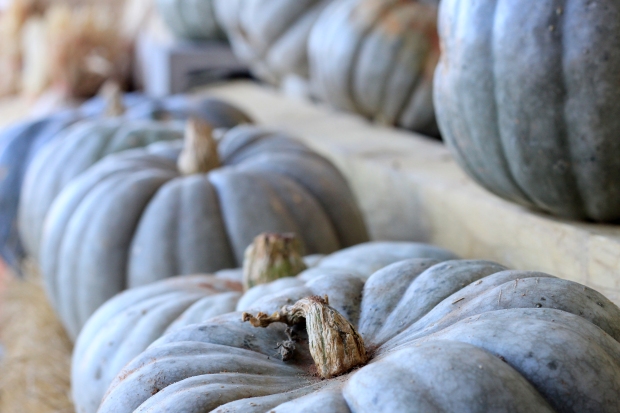
2. Purchase neutral shades.

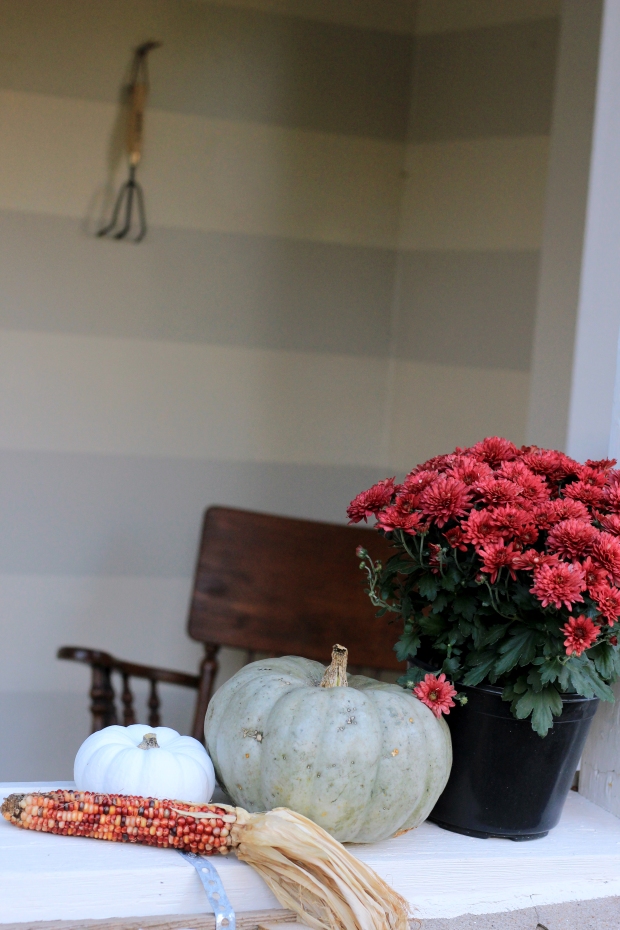
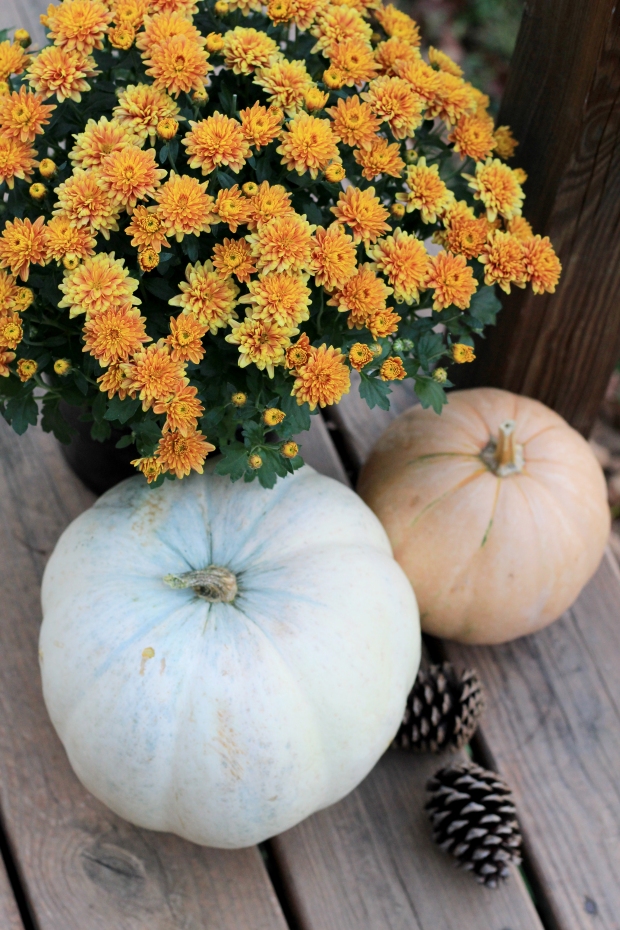
Not only have these neutral pumpkins been on trend, but their muted pallet makes it easier to create different combinations for the entire fall season. I think they’re gorgeous! When picking yours out, choose different shades to mix and match. I chose whites, sage greens, and pale orange winter squash. I used vibrant mums (an inexpensive choice) to brighten up the space. Have fun with it! The more neutrals you have, the easier it is to play around with your accessories.

3. Rotate your pumpkins.

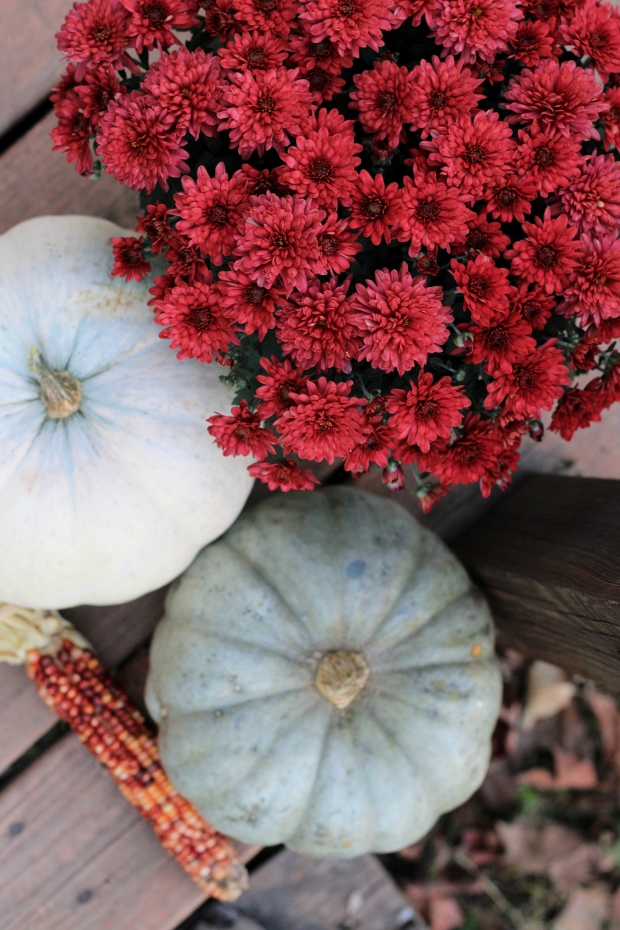
This one might sounds a bit odd at first, but it makes total sense! Once you’ve gathered your favorite bunch of neutral pumpkins, you can easily rotate the different colors and shades in and out of your arrangements. It takes minimal effort, and helps you feel like you constantly have a brand new arrangement. This is especially helpful when you want to inexpensively transition from an October arrangement to a November arrangement. Check out my example below. I took this arrangement from October to November by substituting my winter squash for my sage pumpkin, yellow mums for burgundy, and swapping out my dried accessories — all of which were a part of my original haul.

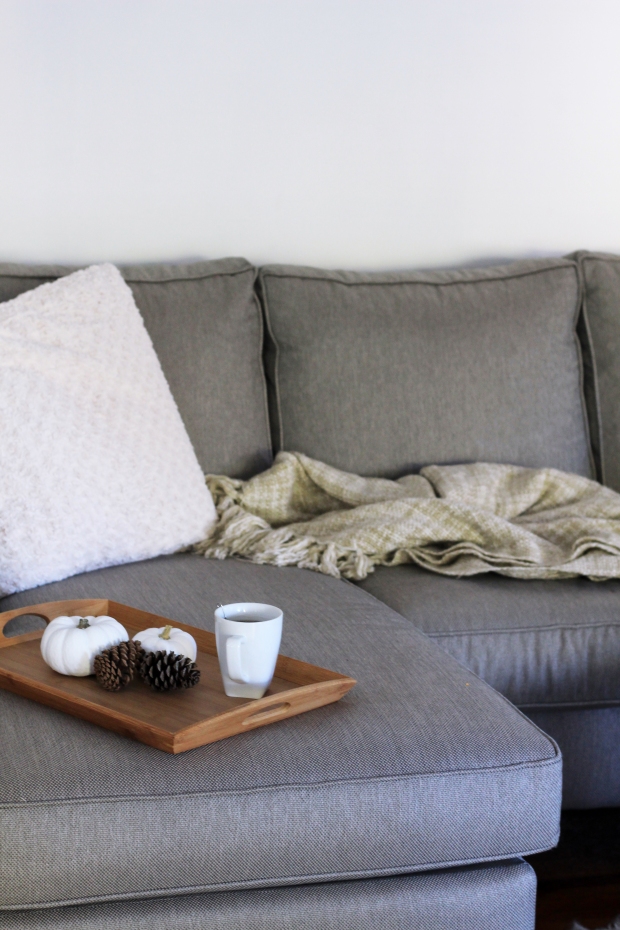
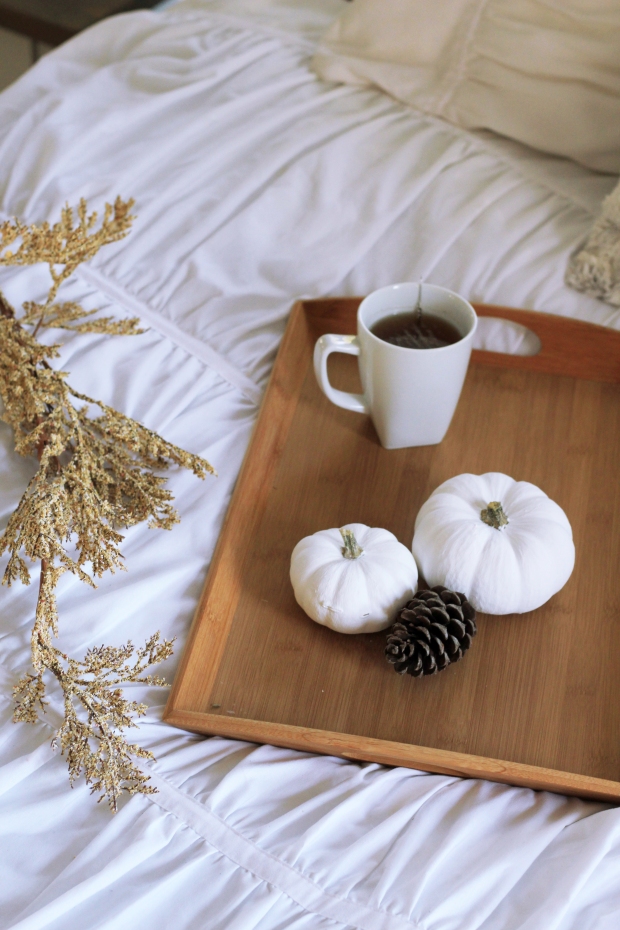
4. Style small pumpkins.

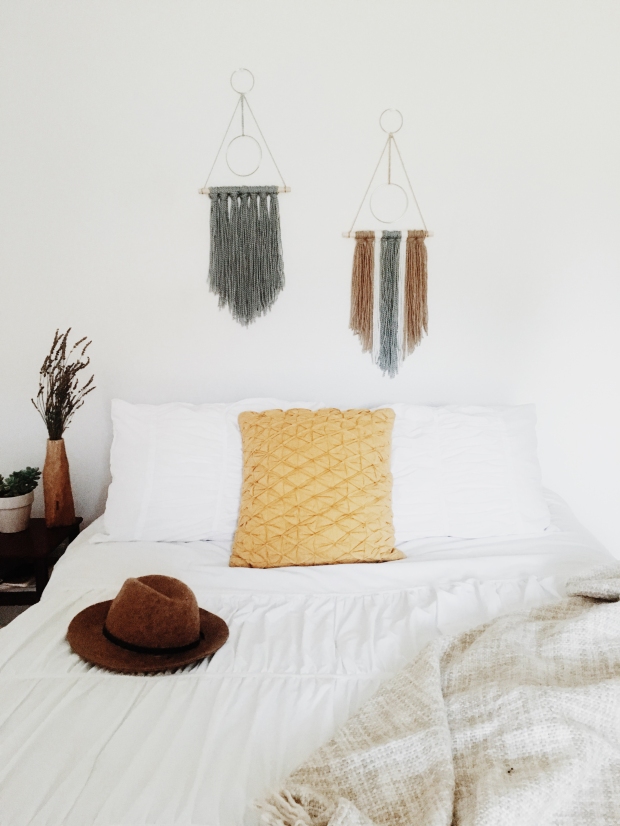
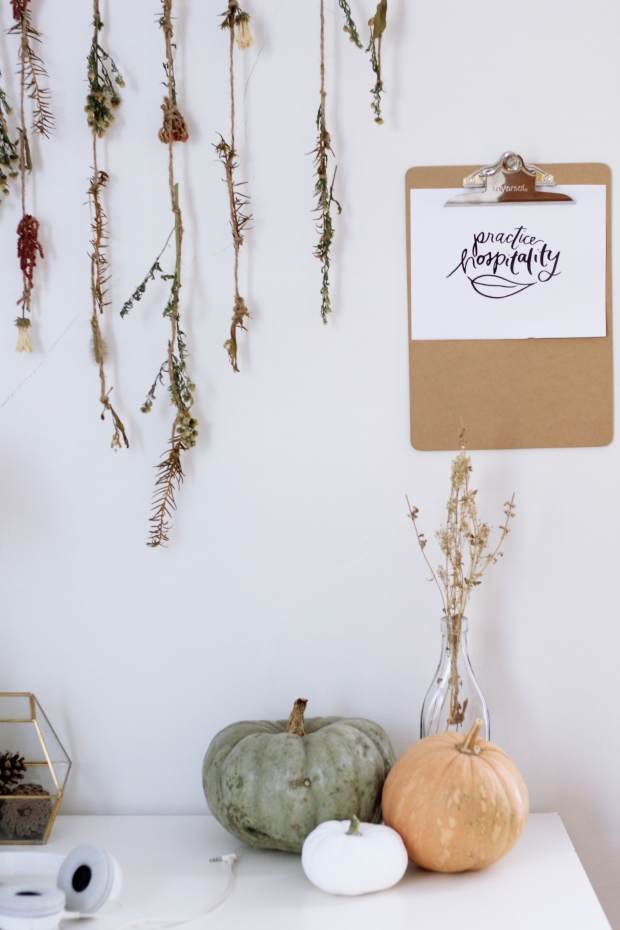
While investing in the beautiful large pumpkins is so fun (and necessary to fill large spaces), I find that the small ones are just as useful. It’s very inexpensive to buy a large bundle or two of the small pumpkins. I found mine at Wal-Mart. I use the small ones to fill in the empty nooks in my house, and it automatically feels more festive and inviting. Check out these simple ways to style the small white pumpkins throughout spaces you might not think of, like your bedroom or office space.

blog3blog011blog4blog6blog8

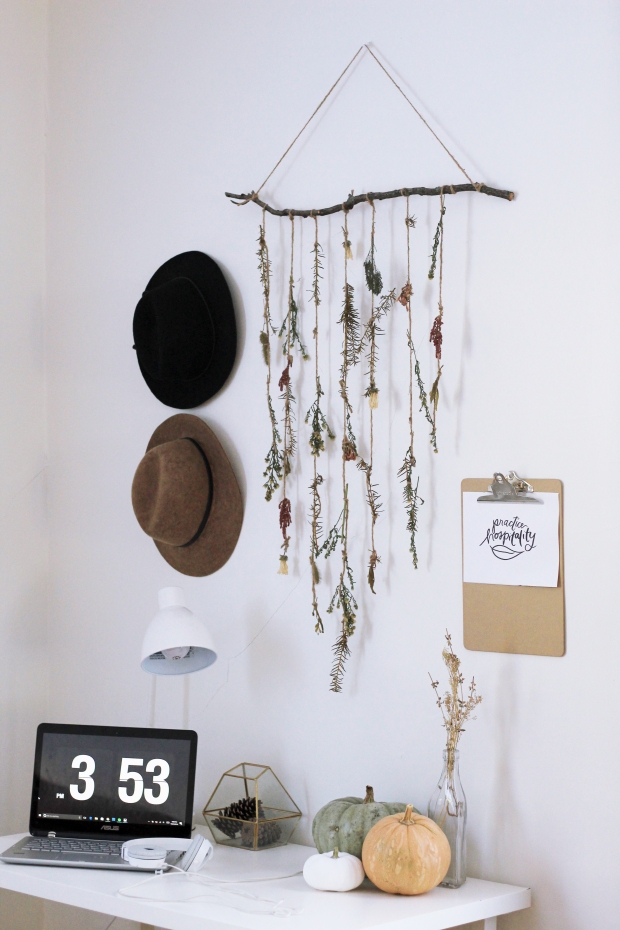
5. Mix and match dried accessories.

For those of you who love the natural look like I do, using dried accessories helps obtain that style while keeping expenses down. Try using dried plants and flowers, pine cones, and maize. All of these dried pieces look great with the pumpkins, and can be preserved or for many fall seasons. In looking at my arrangements, you can see hints of dried accessories all throughout.

blog021blog010blog017

◊◊◊◊◊◊◊◊◊◊◊◊◊◊◊◊◊◊◊◊◊◊◊◊◊◊◊◊◊◊◊◊◊◊◊◊◊◊◊◊◊

I hope you enjoyed these styling tips! I would love to hear about some of your favorite arrangements you’ve seen this fall. Are you an over the top decorator? Do you prefer the natural decorations? I love to see both! Let’s keep the conversation going! Leave a comment below or follow me on my personal Instagram @BethanyMPoteet. We love to chat with you all.

Happy Fall, yall!

Bethany

5 Inexpensive Ways to Style Pumpkins All Fall


DIY: Summer Popsicles

Hello, everyone! It’s Bethany here, and I can’t wait to dive into today’s blog post. Mostly because it has to do with two of my favorite things – summer and ice treats. Once again, Pinterest scrolling has inspired this week’s post (also a touch of pregnancy cravings). I’m not a huge dessert person, but I cannot resist icy treats! My mom used to pour lemonade into our ice trays and add a toothpick for frozen little popsicles. You know, the 90’s kid way. As a child, I just thought that was coolest thing. With my pregnancy, I have found myself thinking about those ice treats all the time!

Why not make my own?!

popsicle_pinterest.png

If you know me, you know my love of DIY’s. What I love about the making your own popsicles is knowing exactly what’s going in them! I found so many on Pinterest that I wanted to try. To narrow it down, I ended up trying one sweet and a one sour. They turned out so deliciously, and they definitely have my family’s stamp of approval!

Let’s take a look.

Lemon-Lime Popsicles:

Photo Jul 11, 5 40 50 PMPhoto Jul 11, 5 41 04 PMPhoto Jul 11, 5 40 44 PM

I found a lot of lemonade/mojito popsicle recipes on Pinterest, but I kind of wanted to scale it back for this one and nod to my mom’s classic little lemonade pops. This one is so simple and refreshing.

What you’ll need:

  • Popsicle molds **Note: I got my popsicle molds from Bed, Bath and Beyond. I researched what type of molds had good reviews. I also wanted to get the flat classic shape, so I went with these. They can be found HERE.
  • Lemonade
  • One lime
  • Mint leaves if desired

What to do:

I made a small batch of lemonade, and filled my popsicle molds half way. See my notes above to find out more about where I found my popsicle molds. I cut thin slices of lime (you can add mint leaves here if desired) and placed them in the middle of the molds. I then poured the rest of my lemonade into the molds, up to the fill line. The popsicle mold instructions said to freeze for 8 hours. I didn’t feel like mine were fully frozen, so I just left them in over night. Once they are frozen, run warm water over the molds for about 30 seconds. Then they are ready to eat!

Roasted Berry Greek Yogurt Popsicles:

Now that I had fulfilled my sour, I wanted to try some sweet! I absolutely love Greek Yogurt and berries! Why not try a recipe that incorporates both into a yummy frozen treat? I was so excited when I found this recipe, and it did NOT disappoint. I would rave about these all day long if I could! I found this recipe through Pinterest, and I couldn’t be happier with how mine turned out!

Photo Jul 11, 5 47 32 PMPhoto Jul 11, 5 47 55 PMPhoto Jul 11, 5 49 28 PM

Before I link this recipe, I want to note a few beginners tips.  Although the recipe says 4 hours for freezing time, mine took over night to freeze. This might be because of the materials of my molds (plastic). Be sure to run warm water over your molds for 30 seconds before taking the popsicles out.

What you need:

  • Popsicle molds
  • 16 oz vanilla Greek yogurt
  • 1 cup fresh blueberries
  • 1 cup fresh strawberries
  • 1 lemon

The recipe and cooking instructions are linked HERE . This recipe was created and written by the awesome food blogger, Sprinkled With Jules. You’ll have to check her out!

◊◊◊◊◊◊◊◊◊◊◊◊◊◊◊◊◊◊◊◊◊◊◊◊◊◊◊◊◊◊◊◊◊◊◊◊

Photo Jul 11, 5 50 55 PM

I absolutely loved both of these popsicles, and I already have materials to make them again. They were a hit with my family, and a few gasps and heart eye emojis came out when everyone tried the berry ones! Please let me know if you make these recipes, or if you have any questions at all! You can keep up with me on Instagram @bethanympoteet, and the rest of us Oak and Earth gals on our social media links in the side bar or footer.

Happy, summer!

Bethany ❤


Pinterest Project Fun: DIY Yarn Hangers

Pinterest_1

Hello, everyone! It’s Bethany here today, and I am so excited to be writing on Oak & Earth  as my favorite season has arrived – summer! During the warmer months, I find myself day dreaming and scrolling through my Pinterest page frequently. With so many fun project ideas available at my fingertips, I decided to take a risk and try one that I’ve been swooning over for a while. DIY Yarn Hangers!

While you can go on Etsy and snag something similar, I prefer DIY’s because you can add personal touches and really make it your own. I also found that the materials to make these hangers are very cost efficient. Once I gathered the materials, I threw on some music and simply tied the evening away. This would be a really fun project to do with some girlfriends!

I chose this yarn hanger DIY in particular because they fit the minimal vibe that I love, the metal rings added a fun touch I hadn’t seen in other yarn hangers, and I thought the user friendly instructions were perfect for a busy girl like me! It turns out, this project wasn’t a Pinterest fail at all (we’ve all had them). I’m absolutely in love, and I think they fit so well with my style and my home.

Here’s how they turned out!

diy4diy6Processed with VSCO with m5 preset

Making the Yarn Hangers

← P R E P A R E 

Because I wanted to hang my pieces in a wide blank space, I decided to make my yarn hangers a little larger than the measurements provided in the DIY. I simply multiplied the measurements to my liking. I found every single material item at Hobby Lobby! Remember that you can choose your own color of yarn, length, texture, tying styles, etc., and that personal choices are part of the fun of doing a DIY!

← M A T E R I A L S →

  • Yarn of choice
  • Scissors
  • Ruler or tape measure
  • Cardboard piece at least 14”
  • Metal rings **Note: The size of ring depends on how large you would like your hanging pieces. The DIY demonstration calls for 1.5” and 3” rings, while I upped the size a touch. There are many sizes to choose from at Hobby Lobby. 
  • Krazy glue
  • Round wood dowel **Note: DIY instructions called for 7. 5″, I chose 12”

← C R A F T →

I followed the instructions in the DIY Yarn Hanger post found HERE. This DIY project was created by the wonderful blogger, Amy, of HomeyOhMy. Her blog is great for minimal and modern home décor ideas and projects, so be sure to check her out!


We are so excited to share all the fun recipes, DIYS, and experiences that we have planned this summer! Please let us know if you try this project, and be sure to suggest some posts you would like to see in the future! You can keep up with me on Instagram @bethanympoteet, as well as our Oak & Earth social media links located in our side bar or footer.

Happy summer, and happy pinning!

Bethany

diy7

Simple Pleasures: D.I.Y. Minimalist Coasters

It’s Bethany here on Oak and Earth today, and I am thrilled to be sharing a few of my favorite simple pleasures and a fun D.I.Y!

Life often gets away from us. I was thinking about this a couple weeks ago. I was crawling into bed, and I realized I hadn’t been still for one moment. Sure I had sat down, but my mind was constantly working or running. Not to be too cliché, but I couldn’t think of a time that I had stopped to smell the roses (or the coffee in my case). That’s when I knew I needed set aside part of my week to enjoy some of my favorite simple pleasures. One of those pleasures being a warm cup of coffee.

coaster5

I have a cup of coffee every morning (more like a thermos because I’m always drinking it as I run out the door for work). Since this slowing down thing is a work in progress, my husband and I try to reserve a portion of the week to actually sit down and enjoy our coffee!  On Saturday mornings, we often have time to pour our coffee into mugs instead of thermoses. We can prop our feet up, stay in our jammies, and sip and enjoy it instead of guzzling it for energy. I love this little time at home. We also love to do fun activities together! So often we go out on the weekend and hit up one of the local coffee shops—another simple pleasure of mine.

While we are there, we set aside time to be still and do what we love! This includes simple things like writing, sketching, listening to music, or reading my favorite blogging magazine called Artful Blogging. If you’re a blogger and haven’t checked it out, it’s such a wonderful little magazine. A new edition comes out every three months, and it’s something I consider a treat and such an inspirational tool.

Sometimes I’ll bring headphones and listen to my favorite music. It sounds cheesy, but I often find myself getting emotional during this time. My head is filled with my favorite tunes, and all I can see around me is creativity. Our notebooks full of ideas, sketch books full of fun, magazines full of inspiration, my husband zoned in on his designs and sketches, a mocha filling me with warm energy, and people bustling all around me while I am still.

We always cap that time with one of my favorite simple pleasures ever created—conversation. Denver and I talk about our dreams, funny stories we didn’t get to share throughout the week, aspirations, and about our relationship. Most importantly, we laugh. I really enjoy being able to set aside time to go do this with my girlfriends as well. I love when we go out together. We often realize hours have passed by, simply because we’ve been enjoying each others company (shout out to my Oak and Earth girls who totally rock). These coffee dates are by far one of my favorite simple pleasures, and they only ever cost us whatever treat we bought at the coffee shop! I always leave feeling so refreshed and inspired. It’s such a nice time to reboot before more adventuring or going into our busy week ahead.

While I love these simple pleasures and experiences, I also love simple design! Minimalism in the home? Yes, please! On one of these coffee shop dates, I came across a D.I.Y for some simple color blocked wooden coasters. I have seen a lot of D.I.Y. coasters on Pinterest and other forums, but these are so simple that they easily became something I wanted to try for our home. I found this D.I.Y. on a fellow blogger’s site SimplyLivBlog. Olivia has such a cute family and blog, you must check it out (I’ll link more of her contact information at the end of this post). I told Olivia I was going to post my experience if I ended up doing the D.I.Y., and I am so excited to share how they turned out! I’ve already put these to use, and they look adorable in the home –a perfect match for our mugs on those slow and simple Saturday mornings. I am so grateful to Olivia for sharing this idea. I couldn’t believe how quick they are to make. Want to make some? Let’s get started!

What do I need?

  • 4” X 4” wooden squares **Note: You can pick up a 2 pack for $1.99 at Hobby Lobby.
  • Wood Stain **Note: Hobby Lobby has many choices so make them personalized to your home! If you like the color I chose, it’s called “Driftwood”. Don’t forget to use your 40 % off Hobby Lobby coupon on your most expensive item, in this case that’s the wood stain. Just google the Hobby Lobby 40% coupon and have the code pulled up at the cash register.
  • White paint
  • Painter’s tape
  • Old rag
  • Paint brush
  • Design stencil if desired

What do I do?

  • Stain your wood blocks:

I simply followed the wood stain directions on the can. I put one coat on each side and edge. After 1-2 minutes, you wipe off the excess stain with your rag. This is an important step to ensure that you will be able to see the wood grain. If you would like extra protection from water stains, use polyurethane as directed. Keep in mind that this might make your stain darker. I wood stained mine at night, and they were ready to go in the morning. I love the color!

  • Tape off your designs: 

I loved Olivia’s designs, so I went ahead and mostly did those. You can choose any simple design you like. I also got a very simple Aztec stencil from Hobby Lobby, and I used it on just a few of my coasters.

  • Paint: 

To keep with my simple designs, I chose white paint. You can choose whatever color you would like! Paint around your tape. After my main designs dried, I added the stencil detail on a couple of the coasters. I simply taped down the Aztec stencil and painted. This step is only necessary if you want that little detail. Let them dry until the paint is no longer tacky.

  • Enjoy: 

I can’t believe how little time they took. Now that I have all this stain and paint, I can’t wait to make more! Here’s a few pictures of how mine turned out.

coaster9coaster4

I am so thrilled that I came across Olivia’s D.I.Y! Now I have some minimalist coasters to go along with our simple coffee breaks at home. What are some of your favorite simple pleasures? Let’s keep the discussion going! You can follow me on Instagram (@bethanympoteet), or follow along with our hashtag #OakAndEarthBlog. Want to see more from Olivia? Check her out on Instagram (@simplylivblog), and follow along with her blog at SimplyLivBlog. I am so thankful that she posted this D.I.Y. Thanks so much for stopping in and sharing in some of my favorite simple pleasures. Because of your constant support, Oak and Earth is now updating bi-weekly! We have a little bit of page overhaul coming up with some ideas to make it easier for you to keep up with us. So be sure to stop in and check that out soon.

Cheers,

-Bethany

DIY: Holiday Dreamcatchers

I don’t know about you guys, but I get a little nutty this time of year. The smells, the sounds, the lights, the traditions! As my Grandpa says, “I’m about run away with nostalgia.” (For those of you not familiar with Southern jargon, that roughly translates to, I’m extremely nostalgic!)

One of my favorite things about the Holiday season is decorating! A little after Thanksgiving I was trying to think of a fun Christmas craft to share here on Oak and Earth, and it suddenly hit me – Holiday dreamcatchers!

Photo Dec 17, 8 33 04 PM

This is such a fun project, and we are so excited about it! So, grab some cocoa, slip into your comfy clothes, put on your favorite Christmas album, and make a craft night of it with your best girlfriends!

Photo Dec 08, 6 41 45 AMPhoto Dec 08, 6 49 05 AMPhoto Dec 08, 7 30 16 AM

Materials:

Metal ring or embroidery ring (we used embroidery rings)

Embroidery thread or hemp (we used embroidery thread)

Leather crafting cord

Yarn (in fun holiday colors!)

Feathers, jingle bells, beads, and/or other embellishments

Photo Dec 08, 6 47 55 AMProcessed with VSCOcam with j4 presetPhoto Dec 08, 7 30 49 AM

Directions:

  1. Glue the leather cord to the ring (we used Tacky Glue) leaving about two inches free at the end of the cord
  2. Begin wrapping the cord around the ring
  3. When you’ve wrapped the entire ring, tie a knot using the end you left free
  4. Cut three yards of embroidery thread or hemp
  5. Tie the embroidery thread onto the ring, near to where you tied the leather cord
  6. Measure about a pinky fingers length away from the knot
  7. Wrap the thread underneath the ring, then loop it through, pulling it tight
  8. Repeat this “knot” around the entire ring
  9. When you get back to the first knot, tie a real knot
  10. Begin going around the ring again, this time making each “knot” in the middle of the thread
  11. Begin adding embellishments as you continue to weave the dreamcatcher (we added jingle bells, which we felt was a great festive element!)
  12. When you get to a stopping point, tie a knot and cut off the end
  13. Begin tying lengths of yarn to the bottom of the dreamcatcher (now begins the really fun part!)
  14. Tie on lengths of leather cord and attach feathers using tacky glue or by tying them on
  15. Add more jingle bells 🙂

The rest is up to your creative instinct! There is quite a bit of room here to let your personality shine. Have fun with it! We think these gold dipped feathers would be a great addition. Also, here is a tutorial with more in depth instructions on basic dreamcatcher weaving, with pictures!

We had a blast with this project and know you will too! Remember, this season is all about making memories with those you love, and crafts are a perfect way to do that! Tag pics of your holiday dreamcatchers to #OakandEarthBlog so we can see your creations!

As always, live healthy, love hard, and have a very Merry Christmas!

– Shelby

Photo Dec 17, 11 36 26 PM

“For unto you is born this day in the city of David a Savior, who is Christ the Lord!” – Luke 2:11


Dessert Apple Cider: A Crock-pot Recipe

Hello, readers! It’s Bethany here for this autumn drink recipe!

Autumn is here in all its glory. With bonfires, hayrides, camping, snuggling, pumpkin spice, boots and scarves, it is time for Hot Apple Cider to make its way to our blog! Not only does this amazing cider have a 5 minute prep time, but  it is made in the kitchen appliance that was brought down from the heavens–the crock-pot *enter hallelujah chorus*.

I love this recipe because it can be made for several different occasions. You can add the dessert toppings and serve this for a fall party, OR  you can choose to keep it as a simple and rustic cider in a mug. The dessert version makes for a fun party favorite, and the simplified version is great to curl up with after a long day. This recipe is based off of a recipe I found on a site that I visit quite often for slow cooker meals: Taste of Home. I highly recommend checking it out! I have tweaked it to my taste, style, and convenience Let’s get started!

blog013blog015

WHAT DO I NEED: 

  • 8 cups apple cider (I buy a gallon jug.)
  • 1/4 cup caramel syrup. **Note: The original recipe calls for 1 cup of caramel, and this was too sweet to me and a few of my taste testers . I prefer a spicier cider, so 1/4 cup is more than enough for me; however, I would suggest 1/2 cup if you like a sweet cider. 
  • 1/4 cup lemon juice
  • 2 cinnamon sticks (3 inches) **Note: I found a small and inexpensive package of cinnamon sticks in the baking isle. 
  • 1 tablespoon whole allspice
  • Cheesecloth or non-bleached coffee filter
  • **Dessert Version: Garnish with  whipped cream, hot caramel ice cream topping and cinnamon sticks (3 inches)

DIRECTIONS (5 min prep time, 2-3 hour cook time) 

  1. In a 3-qt. slow cooker, combine the apple cider, caramel syrup and lemon juice.  
  2. Place the cinnamon sticks and allspice on a double thickness of cheesecloth. Bring up the corners of the bag and tie with string to form a bag. I did not have a cheesecloth, but I have found that a non-bleached coffee filter does essentially the same thing for this recipe! If you find yourself without a cheesecloth, you can follow my lead. After putting these ingredients into my coffee filter, I tied it off like a bag, and left it to steep in my cider mixture for the rest of the cooking time (as seen below). 

blog1blog3

3. Cover and cook on low for 2-3 hours or until heated through. Discard spice bag. Pour cider into mugs; garnish with whipped cream, caramel topping and additional cinnamon sticks if desired. Yield: 12 servings (3/4 cup each).

MAKE YOUR DESSERT

It’s time to decide how you would like to serve it up! This cider can hold its own in a mug or it can be elevated to be a stunning fall dessert drink. If you are going to make it into a dessert drink, be sure to remember that if you put your whipped cream onto your piping hot drink, it might turn loose pretty quickly. I waited a few minutes for it to cool a bit.

blog5blog016blog014blog011

This cider has been a great hit and I can’t wait to share it at my next fall get together! Maybe I’ll have to whip up some  Pumpkin Spice Cakes that Tera blogged about last week to go with it! Be sure the keep up with all of our Oak & Earth adventures through social media, and tell us about your experience! You can follow my adventures on Instagram @BethanyMPoteet.

Happy fall y’all!

-Bethizzle Potizzle with the Apple Cizzle.

blog010


Homemade Baby Food Pouches

Hello, reader! It’s Tera again. This week, I thought I would share with you my experience with dabbling into the world of homemade baby food (in squeeze pouch form). The idea for this post was sparked by my sister in law, and fellow baby mama of a tot, as we visited about how we want to learn some good ways to incorporate healthy foods into our children’s diets, without having to pay Gerber (and other brands) the big bucks. Initially, $1.72 doesn’t sound too bad, but when I total up the cost of weekly pouches devoured, it nears the $30 mark…that’s a week’s worth! If I totaled that number for a whole month, it puts a dent into the grocery bill. But of course, toddlers tend to be a bit finicky, and this is no exception at our household. So getting them to try carrots, broccoli, spinach etcetera, is not an easy task. Having these pouches is so convenient for this very reason, and for many of you moms out there, it’s justifiable to spend the money to get your tots to eat veggies and love them (without them even realizing it)!

For me and anyone else out there who is on a budget, or who likes to find easy ways to save back some money each month, recreating these pouches at home was worth the try. I’ll admit, it was a bit intimidating and seemed like it would take forever and be more difficult than what it’s worth. And honestly, it was a bit of trial and error with a few of them. But, I am here to tell you what I did right (and wrong), and to tell you that it is actually quite easy!

closeuppouch pouches

So first in my process, I needed pouches to store the food in. I went with this brand from WalMart:

freshsqueezepacket

For the general process of filling and storing the food, this system works just fine, and for this starter kit, it was only $10. However, these pouches are not reusable, and a pack of 50 pouches is $15. Depending on how many pouches you go through a month, it may or may not be monetarily beneficial for you. They do make reusable pouches like these that I would probably choose to use for my future endeavors, just to be the most efficient.

For this post today, I’ll share with you four recipes that I tried and liked. The really nice thing about doing these at home, is you can be as creative as you want to with mixing different veggies and fruits. Most of the combos I did were some that I have bought before and knew Norah would like. But there are really endless possibilities of different combos!

Blueberry Banana Oatmeal

blueberryoatmeal

For this breakfast recipe, there are a few simple steps before pureeing. Here are the ingredients I used (roughly measured out for you):

  • 1/2 cup oatmeal
  • 1 cup blueberries
  • 2 bananas
  • 1/4 teaspoon cinnamon

bananacinnamon

You’ll want to cook your oatmeal first so that it is tender. I also steamed the blueberries for about 1 minute in the microwave to make them extra soft. Once these steps are done, add ingredients to a food processor or blender. If you steam blueberries, add some of the liquid steamed from them. Otherwise, you may need to add some water until you get your desired texture. When all the ingredients are blended and smooth, store fresh in these pouches, or freeze and use throughout the week/month! That’s the best part about making these yourself. I found it easiest to store in an ice cube tray, for what it’s worth, but find what works best for you! This recipe makes a yummy breakfast for your tots! Super easy, and toddler approved. You could also sneak some spinach in this recipe to add some healthy greens. Just make sure to steam the spinach beforehand!

Broccoli, Peas and Pear

broccolipearpea peas

This next recipe is also fairly easy. My tip for this (and any recipes with leafy greens, or harder veggies), would be that if you find you can’t get a smooth pureed texture from a food processor, to stick with a blender. Sometimes the blades blend this stuff up better. I have also heard that the Ninja, Nutribullet, and Baby Bullet work wonders for this kind of stuff…next investment?

Ingredients for this:

  • 1/2 cup peas
  • 3/4 cup broccoli (or spinach)
  • 1 whole pear

The most time consuming part about this process is steaming the fruits and veggies. Though it only takes a matter of minutes, the more ripe you can get your produce, the faster. Make sure you steam all of these ingredients to make them soft. If you’re making a few different recipes like I did, steaming a lot of your ingredients together saves time and saves you a step for each one.

steamvegggies steamedapples

After you steam the pears, broccoli and peas, and they are tender and soft, they are ready to be blended. If you have a food processor with a grater, it might be helpful to grate them before pureeing them, but it’s not necessary. This combo needed some added water to make it thinner. If you have water from steaming, try adding some of it! The steaming process brings a lot of vitamins and nutrients into the water, and adding that to your recipe gives your baby the most nutrients possible! When you have a smooth puree, store fresh in the pouches or freeze and save for later! Getting the system down? For this recipe you could also try spinach instead of broccoli, apple in place of a pear, or try adding a big spoonful of plain greek yogurt for added protein!

Avocado Banana

avocado avonana

This one is by far the easiest. There is no steaming involved, and takes no time to blend up!

You’ll just need:

  • 2 avocadoes
  • 2 bananas

Slice both and add the “meat” to your blender. You may need to add a little bit of water to thin it out. Once it’s done, store fresh or freeze for later. Since avocadoes brown quickly once they’ve been sliced, make sure you freeze if your little hasn’t eaten within 24 hours. Also try adding a pear or some greek yogurt for added protein and flavor!

Pumpkin Apple

pumpkinapple

This recipe is also very easy. I didn’t have a sweet potato for this combo, so I used some canned pumpkin!

You just need:

  • 1 can of pumpkin ( or a steamed sweet potato)
  • 2 apples
  • (optional) 1/4 teaspoon of cinnamon

Steam your apples beforehand until they are tender. And if you use sweet potato, it will need to be peeled and steamed too. Once this is done, add all of it to a food processor or blender and mix up! Also add some of the steam water until you get desired texture. Make sure it is well blended. Store fresh in pouches or freeze! This combo is great because you could easily mix it up. Use sweet potato or carrots (steam first) instead of pumpkin, or add some cooked oatmeal and cinnamon to make a healthy breakfast pouch! Just make sure if you use tougher veggies, that you blend them until smooth and a soft puree.

The process of making baby food seems much more intimidating than it really is! It was fun taste testing and mixing different combos. If you can dedicate 1-1.5 hours a week making and storing, your tot will have tons of fresh, healthy snacks that won’t break the bank! Try choosing a few ingredients to mix and match each week, and switch up ingredients the next. If you freeze and store, you’ll have all varieties to choose from. It also gives you a chance to ad-match and get weekly deals on different produce items so you can be cost efficient!

Here are a few more combos I’ll be trying next:

  • raspberry, banana, brown rice (greek yogurt)
  • blueberry, sweet potato, oats
  • avocado, fig, mango
  • green bean, pears, greek yogurt

berryrice spinach closepouch pears

What are some of your combos and tips from your experience?! Keep up with Oak and Earth through my instagram handle @terapianalto for weekly updates and posts, and hashtag your Oak and Earth experiences #OakandEarthBlog !

xo-

Tera